Cover pages (also known as "slip sheets" or "separator sheets") are special service pages that can be optionally added to separate printouts.
FolderMill offers a feature to insert either a blank sheet or a pre-defined cover page template. With the help of these cover pages, you'll easily identify where each new document begins once the printing is complete. You can fully customize cover sheets according to your preferences.
Example
Let's say you're printing several 20-page files — it can be difficult to tell where one document ends and another begins. This is when adding cover pages can be essential, since it will help you save time sorting through printouts.
Quick steps to add a cover page to separate printed documents
Step 1 — Create a Hot Folder and add the Print Document Action
In FolderMill Control Panel, set up a new Hot Folder and add Print document as its Action.
Step 2 — Configure printing settings
In the Print document Action parameters, choose the target printer and any basic preferences (paper size, duplex, etc.). Enable Print cover page here (or you can do it later in the Advanced Settings).

Step 3 — Locate the Service pages section
Switch to Advanced Settings and scroll down to the bottom of the settings list to find the Service pages section.
Step 4 — Choose or design a cover page
Make sure that Print cover page is set to Yes and select a cover page template using Cover page template dropdown menu. In the Cover page template field, pick a built-in layout, browse for your own file, or open Cover page Designer.

Step 5 — Modify the cover page if needed
The default cover page is Filename with FolderMill logo, which will add a page with the FolderMill logotype and the document's name plus extension (e.g., Document.docx) in the center of the page. You can modify the cover page by:
- Choosing another template from the dropdown menu
- Setting path to your own file by selecting -Browse for file- (supported file formats: HTML (.html) and COVER (.cover))
- Designing a custom cover page by choosing -Open Cover page Designer-
Learn more about built-in templates and Cover page Designer below.
Step 6 — Apply changes and start
Click OK to apply changes, then start the FolderMill processor. Now, any file you drop into the Hot Folder will print with cover pages separating each document.
Cover page templates
FolderMill provides several built-in cover page templates to choose from. For example, the default template prints the source file’s name along with the FolderMill logo. You can select from several templates with different cover page layout:
- Blank
- Cover - filename, folder name, folder path, file type
- Cover - filename, folder name, folder path
- Cover - filename, folder name
- Cover - filename, total pages
- Cover - filename, total sheets
- Cover - filename
- Filename with FolderMill logo (previous version)
- Filename with FolderMill logo
- Filename without extension
- Filename without FolderMill logo
- Folder name
- Folder path
Other options are:
- -Browse for file-
- -Open Cover page Designer-
These types include different variations of a filename or file's folder plus additional data and/or the FolderMill logo. Each template is pretty much self-explanatory. To check out how a selected template will look, you can use the cover page preview available in the Cover page Designer. Or, if you're using a template, we recommend trying them out by printing some test files to a virtual printer, such as Microsoft Print to PDF, Universal Document Converter, or Adobe Print to PDF.
Adjusting cover page paper size
You can change the paper size for service pages to the one you like. For example, you have documents in Letter or Legal format. However, the cover sheet is A4 paper by default, and its size doesn't match the rest of the documents. To avoid this, you can change the cover page paper size in the settings.
To set cover page paper size:
- Create a new Hot Folder and add Print document Action
- Open Action's Advanced Settings
- Find the setting Service pages paper size and configure it
Cover page Designer
For custom cover pages, there's Cover page Designer that can be found in the list of cover page templates. So, if built-in cover pages don't meet your needs, you can create your own. With it, you can create and save your own cover page template consisting of customizable elements: text, images, barcodes or rectangles.

You can also insert FolderMill macros (such as file name, author, date/time) so that each cover page is populated with the current document’s metadata. This lets you make highly customized separator pages (for example, with company branding, instructions, or recipient info) without needing an external editor.
Cover pages created with Cover page Designer can be saved as .cover files and used again in different scenarios by saving/loading them. To save a custom cover page, click File → Save As...
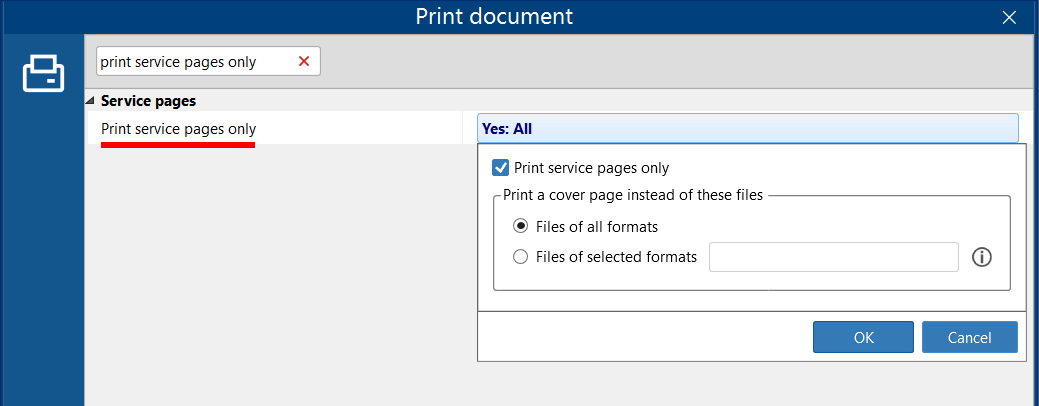
Printing cover pages only
If you want to print cover sheets without the actual documents, it is also possible. To enable this ability, check the box next to Print service pages only. You can also specify which file formats to consider when using this feature. For example, Files of selected formats: XLS, XLSX.
This can be useful for generating all cover sheets in advance or for testing. In the same way, you can control attachments: for example, print just the covers for attached files or output placeholder pages for missing files.
Advanced ways to use cover pages
How to split a PDF by bookmark sections and print them with cover pages inserted between them
You can create a series of two Hot Folder which would:
1. Split a multipage PDF that contains bookmarks into separate parts. Splitting gets done by bookmarks so that each section is divided by bookmarks.
2. Print these separate parts with cover pages between them by using any preferred template, e.g., Cover-filename.
To achieve this, use the configuration outlined below.
Hot Folder #1
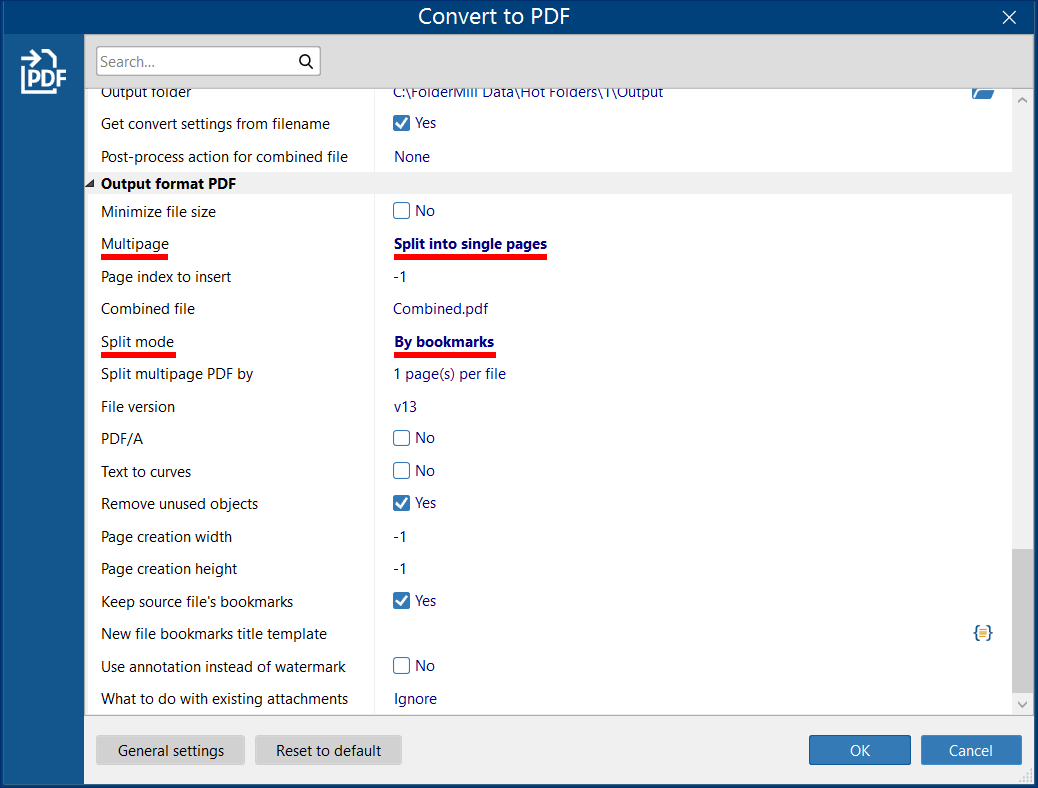
Create a new Convert to PDF Action and set the output path (Output folder) that will serve as a source for the Hot Folder #2. For example, "C:\FolderMill Data\Split by bookmarks".

Open the Advanced Settings and apply these settings:
- Multipage:Split into single pages and
- Split mode:By bookmarks
Hot Folder #2
Create the second Hot Folder, add Print document Action and select the printer you want to use. For this Hot Folder, use the folder path from the Convert to PDF Action's output folder (C:\FolderMill Data\Split by bookmarks) as a Source.

Then, open the Print document Action to configure it and configure the cover page that you prefer (see Quick steps to add a cover page to separate printed documents). As a result, the cover pages will be inserted after each new bookmark section.
Now you have a configuration that would allow splitting a PDF with bookmarks into sections and printing these sections with cover pages separating them.