If you’re new to FolderMill, this is a step-by-step guide to help you find your way around.

This guide applies to FolderMill 4.9. If you're using FolderMill 5.0 or a newer version, please refer to the updated FolderMill User Guide.
FolderMill is a server-based software able to automate converting and printing of multiple files as well as some other tasks with the use of Hot Folders. It can process most popular types of office documents: PDFs, Microsoft Word, RTF and TXT files, Excel files, PowerPoint presentations, Visio drawings and charts, Microsoft Office Publisher and XPS, JPG, PNG, PCX, DCX, Bitmap, GIF, TGA, TIFF images and documents.

General Features |
|
| Convert to Image | Convert files to JPEG, PNG, or TIFF format |
| Convert to PDF | Convert files to PDF or PDF/A format |
| Print document | Print incoming files on selected printer or different printers at the same time |
Additional features |
|
| Filter by filename | Filter files by name or extension to define which files should be processed or skipped according to the filename mask indicated |
| Filter by paper size | Select documents to be processed depending on their page size. Paper size range can be set up using two filters |
| Filter by file contents | Select documents containing specific text. Decide if the entire document or only pages containing certain text should be processed |
| Add text or file watermark | Add text or image type of watermark to your files |
| Copy document to a folder | Copy the original incoming files to a new folder |
| Rename document | Rename files with a certain name or use it to merge files together |
| Run custom application | Execute an application or a script file and set command line parameters (for advanced users) |
The most common tasks performed by FolderMill users are:
- Automatically print all files in a folder
- Automatically convert files to PDF
- Automatically convert files to Image
- Automatically convert to PDF or print EML with attachments
- Append incoming files to PDF or TIFF
- Apply text over PDF
- Control print settings from filename
- Automatically select paper source by document page size
- Automatically print from Google Drive
- Automatically convert ZPL to PDF
- Convert password-protected Word, PDF files and archives
- Process only selected types of files
- Customize alert notifications
Installation
If you haven't done it yet, please download and install FolderMill.
After the installation is complete, FolderMill General Settings menu appears:

In this menu you can set:
- Default root folder and Unable to process folder for FolderMill Data
- Max process time - is a timeout for processing of files
- E-mail alerts - it will send notification on warnings or errors
- Run FolderMill as service
- Automatically start FolderMill when Windows starts
- Language
- Create new logfile after
- Add watermark (instead of cover page; for free version)
You can keep default settings and edit them later, if necessary. Click "OK" to see the main menu - FolderMill Control panel.
FolderMill Control Panel

- Start - runs FolderMill to watch hot folders and real-time processing of incoming files
- Hot Folders - this menu manages a list of Hot Folders. You can Create a new Hot Folder, Edit, Duplicate, Delete, Export or Import a Hot Folder settings
- Log - this menu shows a record log of operations. You can browse between General log, Error log and Detailed log
- Settings - this menu manages Default settings of FolderMill
- About - this menu has information about program version, contact support and other service information
Hot Folders

First, go to Hot Folders menu and create a new Hot Folder by clicking the area on the main window.
In this menu you can set:
- Name - name of a new Hot Folder
- Pause - any Hot Folder can be paused, while others are up and running. Resume it's work by clicking the "Activate" button
- Hot Folder - folder path to a new Hot Folder (C:\FolderMill Data\Hot Folders is default root)
- Move original input files to "Processed" folder - with this option original files will be copied to this folder, but if unchecked your original files will be deleted after processing
- Schedule - sets time intervals when the program should "look into" the Hot Folder and take action

The Advanced dropdown menu allows you to set:
- Delete Processed files after - enable this option if you want your processed files to be automatically deleted after a selected number of days
- Keep original subfolders structure - when your documents go to the "Processed" folder, they have the same subfolders structure as they initially had
- Priority - if you have several Hot Folders running, you may select which one should have more resources to perform its tasks. Select between Low, Normal and High
- Sort files - output files may be sorted by Name, Type, Date (default) or Size. Sorting works for bulk of files that appeared in Hot Folder bewteen rescan
- Ignore masks - use this option to exclude certain filetypes from being processed. For example, type in *.pdf,*.xls (all file types except for PDF and XLS will be processed). These files will be left in incoming folder untouched
FolderMill Data Directory
In the Hot Folder which was created (C:\FolderMill Data\Hot Folders\1) you will see 3 subfolders:
Incoming - is an actual hot folder, where input files are placed by users. Drag'n'drop or copy files into this folder and they will be automatically processed.
Processed - a folder, where original input files will be saved after processing.
Output - a folder, where documents will be stored after being processed (converted to PDF or Image) by FolderMill.
For your convenience, create shortcuts for each Hot Folder or its subfolders for any user involved via LAN network or Internet. Thus, multiple users can work with the documents together.
Action Set

Action set is a task or a combination of tasks assigned to a specific Hot folder. You can easily set several consecutive Actions to be performed. Here is the list of actions that can be assigned:
- Filter by filename
- Add text or file watermark
- Convert to Image
- Convert to PDF
- Print document
- Copy document
- Rename document
- Run custom application

FolderMill performs Actions as they go from left to right in a Hot Folder. After you’ve added all desired Actions, you may click & hold an Action icon and move it left or right between other Action icons to arrange them in proper order. Release the mouse button to place it where necessary.
Filter by filename

This action allows you to filter incoming files by file name or file extension using common filename masks and define which files are to be processed or skipped according to the filename mask indicated. Filter by filename is to be combined with another actions in order to take effect.
Filter by paper size
Filter by paper size Action lets you process or ignore certain documents depending on their page size. Create a new Hot Folder and add Filter by paper size Action:
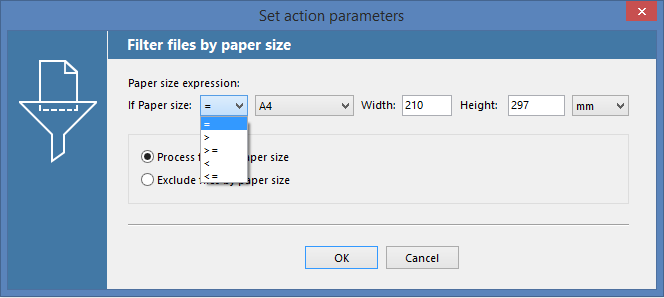
Here you can set page size range to pass through e.g. only documents, which have page format less than A1 or larger than A4. FolderMill will either process or skip incoming files according to the filter. Select between Process files by paper size and Exclude files by paper size. In addition, you can make a combination of two Filters by Page Size one after another, using “greater than” and “less than” characters in order to make a range of documents by paper format.
Filter by file contents
You can let FolderMill process only files containing specific text. In this Action parameters you can specify, which documents should be picked — the whole document containing certain words or only pages which contain specific text. This filter works only for searchable PDF as incoming files so far, but more formats will be added in the future.

Besides text, you can also use wildcard characters:
- Asterisk (star, *). The asterisk is the wildcard character which stands for any string of characters (including no characters at all).
- Question mark (?). The question mark matches one single character. It indicates any random character in the filename.
You can also force FolderMill to ignore incoming documents with certain text by selecting Exclude files containing specific text option.
You need to place Filter by filename before other actions in row. You can combine several action sets and create complex automated processing of incoming files.
Add text or file watermark
This action allows you to apply either a text watermark or a file (image) watermark to incoming documents.
Text watermark
For a watermark, you can select various options such as font type, font size, lettering, text color, background color and their opacity, text placement on the page, or set margins.
You can input desired text in the Text field or use one or several macros from the {=} list, which will add:
- Source File Name
- Source File Extension
- Source File Author
- Source File Creator
- Regular expression of original file name
- Current Date/Time in various format

File watermark menu
Click the folder icon and choose a file to be used as watermark. You can adjust watermark’s alignment, rotation and set margins, if necessary.

Text watermark menu:
You can add a text watermark to all pages of processed documents. There's a variety of available settings to adjust a watermark. You can select font, font size, formatting, text color, background and other parameters.

Convert to Image

This action has the following options:
- Overwrite existing file - previously processed image files will be replaced with the new ones (if they have the same filename)
- Image format: JPEG, PNG, or TIFF. For each format you can choose color mode, output file quality and resolution, or resize the output image
- Compression - allows to select Default, Flate, LZW or JPEG compression method for your TIFF files
- Multipage - As for TIFF format, you can set method and choose one of 3 multi-page options: Multipage for the whole document, Create single-page file for each page or Append pages to existing document. These multipage options also work for "Convert to PDF" Action.
- Rasterization resolution - defines the resolution and quality for rasterized vector files (e.g. PDF, VSD, CDR, AI, PSD). The value for DPI (Dots Per Inch) is 300 by default, it can be set up to 1200.
- Resize output image - allows to set certain size for the output files (in pixels): Don't resize, Fit rectangle, width, height or thumbnail (fit rectangle and fill backgrouns with color)
Flexible output files numbering
When converting documents to Image files, such as JPG, PNG, or single-page TIFF it is also possible to tune the page numbering for output file pages and add leading zeroes to them. By default, files are numerated in line with the following pattern: Document 01, Document 02, … Document 10.
Open additional menu in 'Convert document to Image' by pressing Ctrl+Alt+i. In the appeared menu find line PageFrm="%0*d". Value "%0*d" is set by default and enumerates document pages according to actual file number of pages.
However, you can edit to change it: PageFrm="%0xd", where х = the desired amount of number positions for the counting number, for instance, PageFrm="%03d" - value "3" will set 3 digit positions to the end of the file pages of the output document, and they will have the following pattern: Document-001, Document-002, ... Document-010 ... Document-100
If you set this line to PageFrm="%d", it will exclude leading zeros and additional digit positions for the file pages of the output document, and they will have the following pattern: Document-1 Document-2 ... Document-10 ... Document-100
Tuning these settings will make file sorting and group alignment of the output files more flexible.
In order to have more expanded printing options in terms of output file, more formats supported and other featrures, we suggest using Universal Document Converter alongside FolderMill. We provide commercial license of Universal Document Converter as a virtual printer together with a license of FolderMill by request.
Convert to PDF

This action allows you to convert your files into PDF with selectable options:
- Make PDF/A standard. PDF/A is an ISO-standardized version of the Portable Document Format (PDF) specialized for the digital preservation of electronic documents. PDF/A achieves its self-sustainability by embedding the information (content, color, font, images, text, etc.) needed for displaying the document within the document itself. In other words, PDF/A does not require any additional outside information to display properly. However, for this format to achieve self-sustainability, it must exclude certain features allowed in standard PDF files such as movies, sound, and transparency.
- Append to existing PDF. This option will have the new incoming files converted to PDF and then appended (added to the last page of the existing document) to multi-page PDF file with the same filename.
- Overwrite existing file. If an Output folder already contains a file with the same filename, this option enabled will replace it with a new one after conversion.
Print document

This action allows you to print documents on a selected printer and set standard preferences for it: choosing paper quality and selecting the pages to print. Additionally, you can enable or disable printing e-mail attachments when working with EML format. See full list of files supported for printing.
You can automate printing of files simply by placing documents into Incoming folder. For this Action you can set:
- Printer and printer settings
- Pages range
- Number of copies
- Type of collation: collation by pages or uncollated
- Printing e-mail attachments
- Printing cover page
Control print settings from filename
Moreover, you can determine print settings by adding the values at the end of the document name. Rename your document according to this pattern:
your-original-filename-copies=2-duplex=1-tray=2-type=244-pagerange='1,5-10'.pdf
Copies=2 - sets the number of copies
Duplex=1 - sets double-sided printing; 1-simplex 2-duplex 3-duplex horizontal
Tray=2 - sets paper source by tray ID
Type=244 - sets paper type ID (for HP printers only)
Pagerange='1,5-10' - sets exact pages to be printed
Automatically select paper source by document page size
If your printer provides a variety of paper sources for printing, you can let FolderMill automatically select the most appropriate paper tray, depending on page size of each incoming document. To enable this function, add Print Document Action, press Ctrl + Alt + i to open advanced settings, find line ChoosePaperSourceByDocPageSize=0 and change it to ChoosePaperSourceByDocPageSize=1.
Copy document to a folder

This action provides an additional option for copying the incoming files to another folder. Set path to the new folder by clicking the folder icon. You can also enable 'Overwrite existing files', and the previously processed files will be replaced with the new ones (if they have the same filename).
Rename document

This action allows you to set specific filenames for a particular document or a group of documents. You can set defined filename, so all incoming documents will be renamed with the same filename.
Alternatively, you can use a wide list of macros from the {=} list:
- {Name} - a macro, which will apply the original (source file) filename to the output file. {Ext} - a macro, which will apply the original (source file) extension to the output file.
- Regular expression of original file name - modifies the filename of an output file. You can add a regular expression using special syntax or use a suggested pattern, which will use the whole name of the original document or a part of it (digits from beginning, digits from the end, any first 10 symbols, symbols after dash) and apply it to the output filename.
- Date/Time - adds current date or time in specific format
Run custom application

This Action is for for advanced users. It allows you to execute an application or a script file and set command line parameters.
- Path to application or a script file - select path to .exe or .bat file to run application or a script
- Command line parameters - sets additional parameters for the application or script used. You can use a Source document path macro {Doc} showing the path to the source document which is being currently processed
- Run in hidden mode - runs the application or a script hidden (application window will be hidden)
- Wait until process is finished - does not resume work until the application or script process is finished
Miscellaneous
Automatically convert Zebra ZPL to PDF
You can easily convert labels, industrial barcodes or QR-codes to PDF as well as bulk print them. Simply drop the ZPL files to the Hot Folder and get them in PDF format in the Output folder. You can also set the size of output labels - add Convert to PDF Action and press Ctrl + Alt + i on your keyboard. Then modify the lines shown below:

Here you'll find variables related to ZPL:
| Variable | Recommended | |
| Label height | Zpl_height=152 | any value, mm |
| Label width | Zpl_width=101 | any value, mm |
Convert password-protected Word, PDF files and archives
FolderMill can process Word files, PDFs and RAR, ZIP and 7ZIP archives with password protection. Open Convert to Image or Convert to PDF Action parameters, click Ctrl + Alt + i to open advanced settings and find line SrcPwd="". Enter the password between the double quotation marks. You can enter multiple passwords (as many as needed), e.g.
SrcPwd="[password1]","[password2]","[password3]"
And click OK. FolderMill will try all passwords you've entered in order to process each incoming password-protected archive, Word or PDF file.
Process only selected types of files
Press Ctrl + Alt + R to open Hot Folder advanced settings and you’ll see the HotFolderIgnoreMask variable. Type in masks between the quotation marks, for example “*.doc,*.docx” and change 0 to 1, i.e. HotFolderIgnoreMask=“*.doc,*.docx”,1.
In this case, only DOC and DOCX will be processed, and all the rest incoming files will remain in the Hot Folder.

Customize alert notifications
In order to instantly get warnings or errors due to file or folder access restrictions or other types of notifications, you can adjust in General Settings. The notifications will be delivered directly to your e-mail. Customize the body and the subject by clicking the SMTP Server Settings button:

Subject
FolderMill: {DateTime} - {Severity} alert hot folder "{HFName}" - "{DocName}"
| {DateTime} | Date and time |
| {Severity} | Severity level |
| {HFName} | Hot Folder name |
| {DocName} | Name of the document |
Body
Action #{ActNumber} - "{ActName}" - {Severity} - {ErrorMsg}
| {ActNumber} | Action number in the Action Set |
| {ActName} | Action name |
| {Severity} | Severity level |
| {ErrorMsg} | Error description |
You can distribute the sending of notifications about each Hot Folder to different inboxes. In order to do it, open Hot Folder advanced settings by pressing Ctrl + Alt + R, find line NotifySMTP_ToAddress="" and enter e-mail for this particular Hot Folder (between the double quotation marks).
Keep your FolderMill configuration safe
Once you have set up everything, we advise you to backup settings and Hot Folders. We suggest doing this just in case. Unexpected things might result from changes or updates in your Windows system, accidental removal of Hot Folders, or changing of rules applied to them. But, having a backup, you can always revert to the saved settings and configuration if things go wrong.
Drag'n'drop files into Incoming folder
Once the Hot folders are configured and FolderMill is running - simply place the incoming files to the Incoming folder and get the output files from the Output folder. You can use as many Hot Folders as you need and share them to all your end-users or routine processes.