Printing all incoming emails aids in preserving important correspondence, such as orders, receipts, or invoices either in hard copy form or in a PDF format. This practice is common among e-shops and other businesses that receive emails for orders and instantly send automatic replies.
Printing emails automatically on Windows can be a convenient way to save your correspondence. Whether you're using Outlook or any other email client, automation of the printing process can save you time and effort. Here's a step-by-step guide to help you print incoming emails and attachments automatically or just save them as files.

How to automatically print an email when it is received
FolderMill, a hot folder software, can automatically print incoming mail. You can configure FolderMill to process all incoming mail or only those that meet your set criteria. It accesses the email box via IMAP or POP3, downloads the email, and then prints it or saves it in a specified folder. This allows you to save emails as a PDF (or in original MSG/EML format) — for archival purposes. Let's see how to set up the email auto-print feature in FolderMill in more detail.

Therefore, FolderMill can be a great solution that automatically prints email when it arrives at your Inbox without you having to do anything manually.
Quick steps to print incoming emails automatically via FolderMill
Instruction applies to: FolderMill 5.0 (or newer)
Step 1.
Download and install FolderMill on your Windows computer or server.
Step 2.
Create a new Hot Folder and select Source: Email.

Step 3.
Click the Configure button and input your mailbox details. Afterwards, click Test to check the connection with your email box. Click OK.


Unsure how to configure your Internet Email Settings?
Please refer to our step-by-step guide:
Setting up Email as Source with IMAP step by step
Step 4.
Back in the Hot Folder settings, add the Print document Action and select the printer you want to use.

Review the parameters of the Print document Action and click OK.
 Looking to digitally save incoming emails as PDFs? Simply add a Convert to PDF Action that will store your emails as PDF files in a designated folder. This Action can be used as a replacement for or in addition to the Print document Action.
Step 5.
Start FolderMill's real-time monitoring and file processing by clicking the Start button on the Control Panel.

Note: Before selecting a traditional printer that consumes ink (toner) and paper, consider trying a virtual printer for tests. You can use Microsoft Print to PDF, Adobe PDF printer, or Universal Document Converter. This allows you to test your configuration in advance.
Congratulations, the configuration is complete! Now each time a new email arrives to your mailbox, it will be automatically printed. You will also see the processing of email message files indicated on the Control Panel.
We recommend creating a separate mailbox and forwarding copies of emails to it to be processed by FolderMill.
By following these steps, you can set up automatic printing of emails as soon as they arrive, ensuring that your important correspondence is promptly available in hard copy or digital form.
Download FolderMill to print emails automatically
 Additionally, you can configure FolderMill in case you want to:
- Decide whether to print just the message (email body), only the attachment(s), or both
- Process specific emails by applying filters such as "From", "Subject", "Date within", "Has attachment", and more
- Automate printing for emails already saved in EML or MSG format
- Send email alerts whenever a file appears in a Hot Folder (without sending the file itself)
Benefits of using FolderMill for automatic printing of incoming mail
- Easy to configure. Printing emails automatically through clients like Outlook or Gmail can be a challenging and tedious process. FolderMill serves as a better solution since it can print all incoming emails with minimal effort.
- Rule-based processing of emails. FolderMill allows you to set up rule-based processing of emails. This means it can filter emails based on various criteria such as the sender's name ("From"), delivery time period (date range), subject, or keyword (e.g., "invoice").
- You don't need any email client running. You don't have to have Outlook or any other email program running for automated printing.
- Can work independently as a service, without requiring a Windows user to log in. It has the capability to work in service mode under the Local System account, eliminating the need to log on under a personal Windows account.
We use your FolderMill program very effectively in our company. <...> There is nothing like it on the market, and it can be a huge help for organizations that need an operational mailbox to get attachments into the directory.
- feedback from a customer.
Setting up automatic printing of emails in Microsoft Outlook
Instruction applies to: Microsoft® Outlook® for Microsoft 365
Printing an email automatically once it's received in Outlook requires setting up Email Rules. To automatically print emails on Windows using Microsoft Outlook, follow the steps below.
Note: you will need the Outlook email client installed on your computer as an application. The web version will not do.
Step 1.
Open Outlook: Launch Microsoft Outlook on your Windows computer.
Step 2.
Create a Rule: Go to the "Home" tab and click on "Rules" → "Create rule…"

Note: if you can't find the "Rules" setting, your ribbon is switched to the simplified version. To make it visible, change Simplified Ribbon to Classic Ribbon under Ribbon Layout in the top right corner.

Step 3.
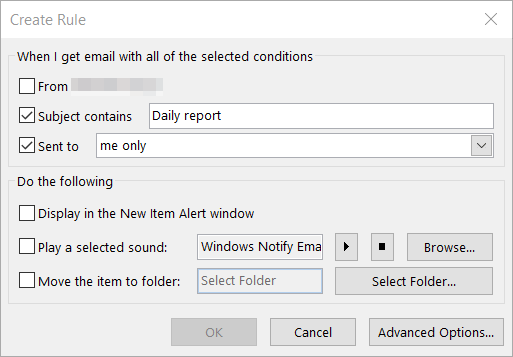
The Create Rule wizard appears. In this section, you can select conditions and decide what actions to take for incoming messages that meet these conditions. You have the ability to set conditions to filter specific emails for printing, like emails from a specific sender or those containing certain keywords. For example, you may wish to automatically print messages that only have a certain text in the "Subject" line. Alternatively, you can leave these fields empty.
Click on "Advanced Options…" to proceed.
Step 4.
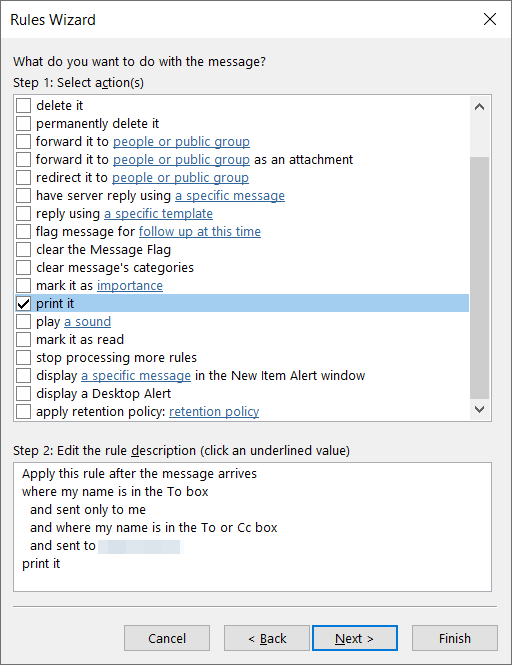
"Which conditions do you want to check?" dialog appears. Select the conditions to apply when the message arrives. Here you can enable multiple options, for example:
- sent only to me
- sent to <your username>
- where my name is in the To box
- where my name is in the To or Cc box, etc.

Step 5.
Select "print it" action: In the list of actions, scroll down and check "print it" under "Step 1: Select action(s)." Click on Next to proceed.
Step 6.
"Are there any exceptions?" dialog appears. Enable the exceptions, if needed. Click on Next to proceed.
Step 7.
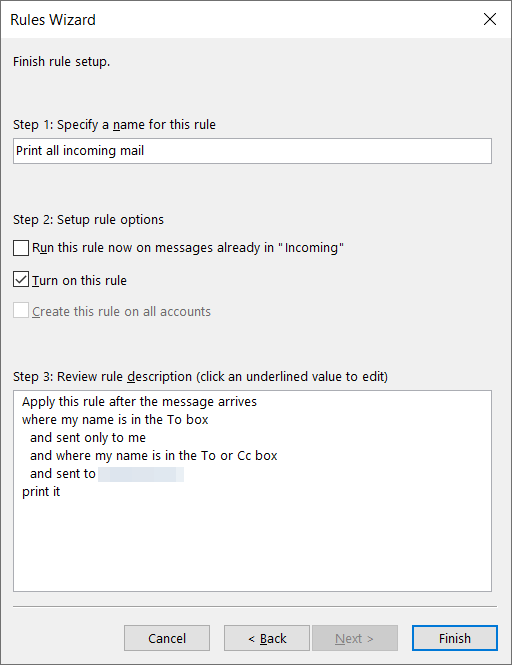
Complete the rule: Check that everything is set correctly. Name your rule and click "Finish" to save it. Outlook will tell you that the rule will be working only when the program is running.
Step 8.
(Optional) Check the rule again: Back in the Rules and Alerts dialog box, make sure the newly created rule is set correctly and edit it if it is needed. Click "Apply" and then "OK" to save settings.
 Check the rule again")
Now, any incoming email that matches the rule you've set will automatically print from the printer connected to your computer.
Which printer will be used to print the emails?
Outlook will use the printer set as the default in your Windows system. You can double-check which printer is set as the default and change it if necessary. To do this, go to the Control Panel → Hardware and Sound → View devices and printers.

Setting up the auto-print feature in Gmail
In Gmail, your emails are well-organized and labeled for convenience. However, Gmail opens each email thread individually, and there isn't a built-in option to bulk print them all at once.
Unfortunately, Gmail does not offer a built-in feature to print multiple threads at once. Previously, it was possible to configure automated email printing by using Gmail filters (filters that forward all incoming mail to a certain email address) in combination with Google Cloud Print. But Google Cloud Print was discontinued at the end of 2020.
In light of Google Cloud Print's discontinuation, a more reliable alternative for automatically printing Gmail emails is to use a third-party solution or an email client with built-in printing features. One such solution is to use FolderMill without the necessity to install any email client program.
Important сonsiderations (regardless of the chosen method)
Printer setup: Ensure that your printer is connected and properly configured on your computer. After setting up the rule, make sure your printer is connected and turned on when emails come in. If the printer is off or disconnected, the emails won't be printed automatically.
Testing: Test the rule by sending a test email to yourself or by asking someone to send you an email. Verify that the email is automatically printed according to the rule.
Rule management: Review and manage your rules to ensure they're working as intended and to make any necessary adjustments. Also, note that the "Print it" action in Outlook will print the entire email, including any attachments.
Resource usage: Be mindful of unnecessary printing. Consider the environmental impact and cost implications of automatically printing every received email. To avoid printing unnecessary emails, use input filters.
Consider carefully before using your personal mailbox: We do not recommend using your personal email address for automatic printing, to avoid printing every message or file you receive. Instead, creating a separate mailbox and forwarding copies of emails to it for processing by FolderMill is recommended. This approach will protect emails that should not be processed or marked as "read", ensuring the safety of your existing workflows.
If creating a separate mailbox isn't an option and if you are sure of what you are doing, go for it. With the correct setup, everything should work smoothly.
Summary
Using the right tools, you can configure an email client to print any of your queues, including your inbox, automatically.
For any solutions besides FolderMill mentioned in this article, please be aware that the precise steps may differ based on the email client or software you're using. For more detailed instructions, it's advised to consult the documentation or support resources specific to your email client or third-party software.
Having difficulty setting up automatic printing of emails? Please contact us.
You may also like to read:
Google, Google Cloud Print, and related marks and logos are trademarks of Google LLC. All other mentioned company and product names are trademarks of the companies with which they are associated.